 Save
Save My mother once told me that pavlova was invented by accident—a baker's mistake that turned into magic. Years later, standing in my own kitchen on a humid afternoon, I understood exactly what she meant. As I folded cornstarch into glossy peaks of egg white, watching the mixture transform from cloud-soft to structured perfection, I realized this dessert wasn't really about technique at all. It was about creating something so delicate and beautiful that it felt like a gift just by existing. That's when I knew pavlova had to be my Mother's Day signature.
I made this for my mom on a spring afternoon when the kitchen smelled like vanilla and possibility. She watched me spread the meringue into that elegant nest shape, then laughed when I got nervous about opening the oven door. By the time we topped it with berries and whipped cream, she was already planning when to make it again. That dessert became less about impressing her and more about us laughing together over something we'd created—something that tasted as good as it looked.
Ingredients
- Egg whites (4 large, room temperature): Cold eggs won't whip properly, so pull them from the fridge 30 minutes before starting—this small step makes an enormous difference in how quickly they transform.
- Superfine sugar (1 cup): Regular granulated sugar works if that's what you have, but superfine dissolves more smoothly into the whites and creates that silky texture faster.
- Cornstarch (1 tsp): This is your secret weapon for keeping the inside marshmallow-soft while the outside stays crisp and shiny.
- White vinegar (1 tsp): It stabilizes the egg whites and prevents them from deflating, which I learned after one disappointing collapsed pavlova.
- Pure vanilla extract (1 tsp for meringue, 1 tsp for cream): Use pure vanilla, not imitation—the flavor difference shows up in such a delicate dessert.
- Heavy whipping cream (1 cup, chilled): Cold cream whips faster and holds its shape better, so chill your bowl and beaters too if you have time.
- Powdered sugar (2 tbsp for cream, 1 tbsp for dusting): This dissolves instantly into cream, unlike granulated sugar which can make it grainy.
- Mixed berries (4 cups total): Choose the ripest berries you can find—they're the final flourish, so their flavor and color matter.
- Fresh mint leaves (optional): A small handful adds a bright, fresh note that makes the whole dessert feel more refined.
Tired of Takeout? 🥡
Get 10 meals you can make faster than delivery arrives. Seriously.
One email. No spam. Unsubscribe anytime.
Instructions
- Prepare your space:
- Preheat the oven to 250°F and line a baking sheet with parchment paper, tracing a 9-inch circle as your guide. Make absolutely sure your mixing bowl and beaters are spotlessly clean and dry—even one drop of oil or egg yolk will sabotage your meringue.
- Whip the egg whites:
- Beat the room-temperature egg whites with a pinch of salt until soft peaks form, watching for that moment when the mixture turns from translucent to opaque white. This usually takes 2-3 minutes, and you'll hear the sound change in the mixer.
- Add sugar gradually:
- Sprinkle in the superfine sugar one tablespoon at a time while the mixer runs, letting each addition fully incorporate before adding the next. After 5-6 minutes of beating, you should have glossy, stiff peaks that hold their shape when you lift the beater.
- Fold in the magic ingredients:
- Gently fold in the cornstarch, vinegar, and vanilla extract using a spatula, being careful not to deflate all those lovely peaks you just created. I use about 8-10 careful folding motions, turning the bowl as I go.
- Shape into a nest:
- Spoon the meringue onto the parchment circle, using the back of a spatula to create a nest shape with slightly raised edges that will cradle the cream and berries. It doesn't have to be perfect—the slight imperfections actually make it look more homemade and charming.
- Bake low and slow:
- Bake for 1 hour 15 minutes at the low temperature, then turn off the oven and crack the door open just slightly. Let the pavlova sit in the cooling oven for at least an hour, or until it's completely cool—this prevents cracking.
- Whip the cream:
- While waiting, whip your chilled heavy cream with powdered sugar and vanilla until soft peaks form, which takes about 3-4 minutes. Don't overbeat or you'll end up with grainy, separated cream—stop as soon as it holds its shape.
- Assemble with care:
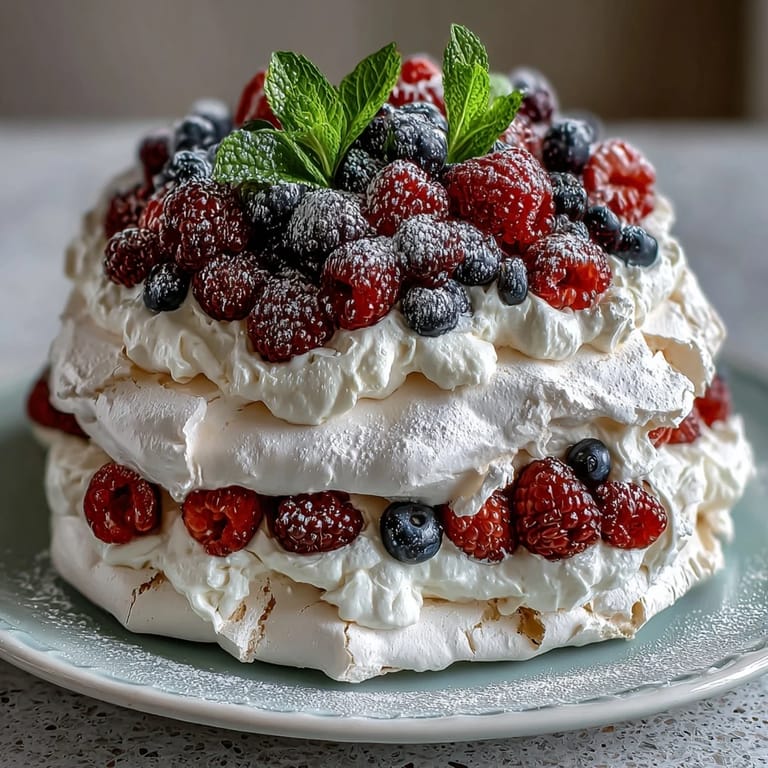
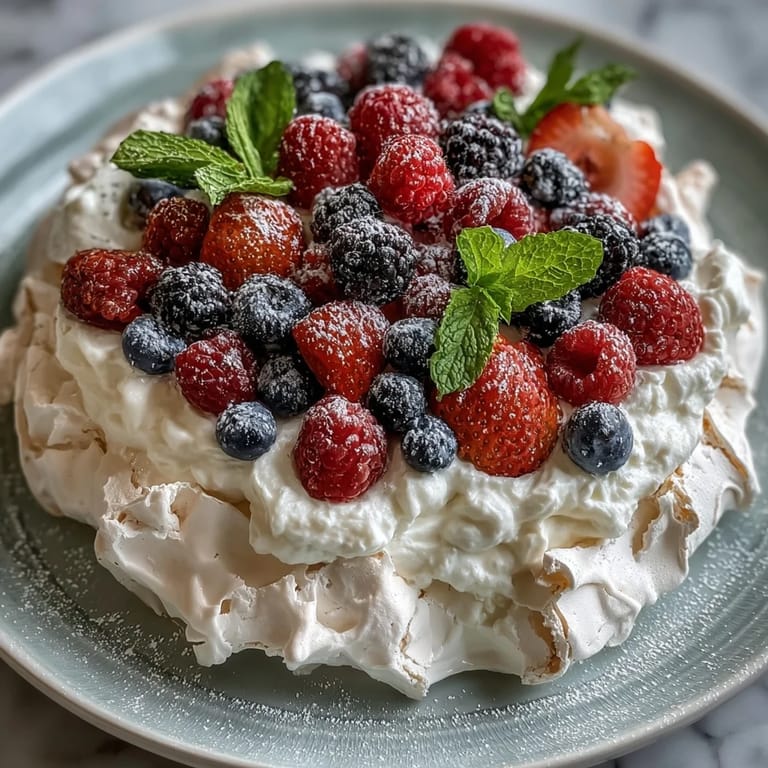
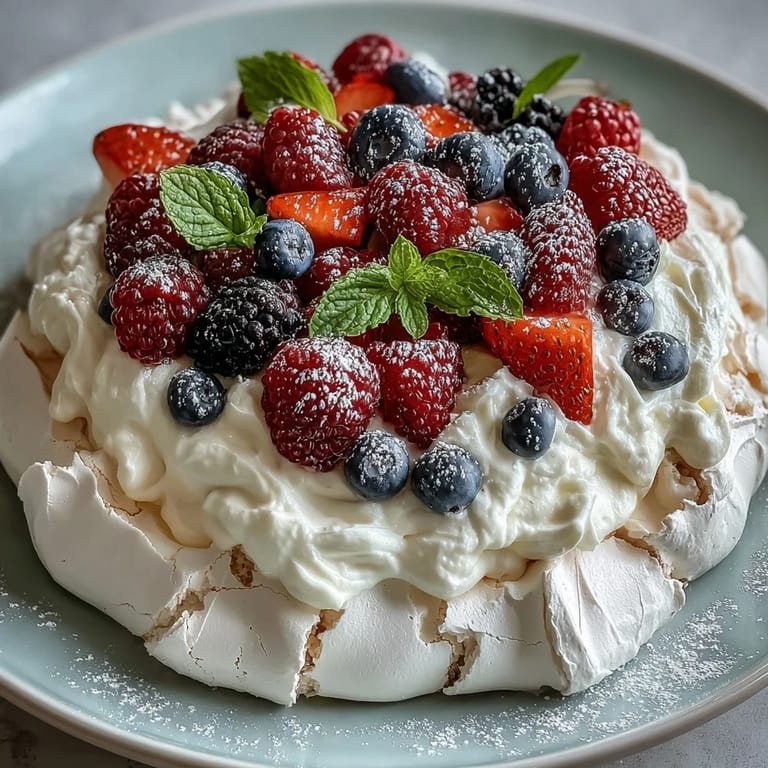
- Transfer the cooled pavlova to your serving platter, dollop generously with whipped cream, then scatter the fresh berries across the top. A light dusting of powdered sugar and a few mint leaves finish it off beautifully.
 Save
Save There's something almost ceremonial about presenting a pavlova, the way the late afternoon light catches those glossy meringue peaks. My mom looked at it like it was a present wrapped in spun sugar and berries, and suddenly all my kitchen anxiety melted away. That's when food stops being about technique and becomes about love—and that's exactly what this dessert is meant to be.
Why Pavlova for Mother's Day
Pavlova has this elegant, almost theatrical quality that makes any occasion feel special without requiring you to stress for three days beforehand. It's the kind of dessert that says you care enough to do something a little fancier, but not so complicated that you're stressed while she's trying to enjoy brunch. Plus, it arrives at the table as this stunning centerpiece that everyone photographs before they eat it, which somehow makes the whole celebration feel more memorable.
Timing and Make-Ahead Magic
The beautiful part about pavlova is that you can actually bake the meringue shell a day or two ahead, storing it in an airtight container away from humidity. This means on Mother's Day morning, you're just whipping cream and arranging berries, which takes about 10 minutes. I've learned this the hard way—the stress of last-minute baking definitely doesn't pair well with trying to make someone feel celebrated and loved.
Berry Selection and Substitutions
Fresh berries are ideal, but this dessert is flexible enough to work with whatever looks good at your market. During winter months, I've successfully used thawed frozen berries, kiwi slices, or even thin peach slices for a completely different but equally gorgeous effect. The cornstarch in the meringue keeps everything from getting soggy, so don't worry about the berries weeping their juices into your carefully constructed nest.
- Shop for berries the day before and store them in a single layer so they stay firm and beautiful.
- If you want to add a chocolate version, fold 2 tablespoons of sifted cocoa powder into the meringue before baking for a more decadent twist.
- A tiny pinch of lemon zest added to the whipped cream brings brightness that plays beautifully against sweet berries.
 Save
Save There's real joy in creating something so beautiful that it becomes the highlight of the day, and pavlova does that effortlessly. Make this for your mom, and I promise the dessert will be the least important part of what she remembers about the day.
Recipe FAQs
- → How do I achieve the perfect meringue texture?
Beat egg whites until soft peaks form, then gradually add superfine sugar until stiff, glossy peaks develop. Slow baking at low temperature ensures a crisp shell with a soft center.
- → Can I substitute berries for other fruits?
Yes, seasonal fruits like kiwi, peaches, or passionfruit work well as topping alternatives for varied flavors and colors.
- → What causes the meringue to lose its crispness?
Humidity and moisture can soften the meringue shell. It’s best to prepare on dry days and store in a dry, cool environment.
- → Is there a way to add a chocolate twist?
Yes, folding sifted cocoa powder into the meringue before baking creates a subtle chocolate flavor throughout the dessert.
- → How should the pavlova be cooled after baking?
Leave the pavlova in the switched-off oven with the door slightly ajar to cool completely. This prevents cracks and maintains texture.